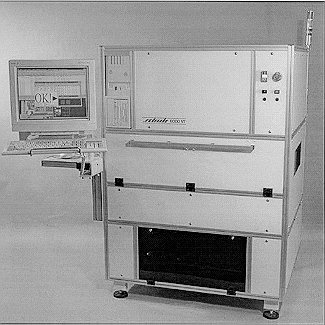

The VT8000 Series Automatic Optical Inspection Svstem

The Schuh VT8000 series optical inspection system has been designed to locate
manufacturing faults created by incorrect placement of components and inconsistant
solderjoints. Typically, modern manufacturing plants have a highly pressuriser
situation where the identification of faults needs to be quick, accurate and detected
at the earliest point. The Schuh VT8000 Series Automatic Optical Inspection system
fulfils all of these criteria.


Speed of test.
Approximately 8.25CM2 per second for the most demanding reflow solder inspection with significant improvements for wave
and comportent checking only.
Accuracy.
The Schuh processing system is optimised to accurately handle the mass of information used in checking the component criteria.
Inspection point.
The system is flexible enough to place at any of the critical points of manufacturing whether pre reflow, post reflow, or after wave
soldering. The versatility of the software allows for the same machine to cover all of these fonctions.
Why test Optically?
It is widely accepted that 100% manual inspection is ineffective and expensive, but is still required to eliminate the typical
manufacturing faults that occur even on the most accurate production line. By eliminating the human involvement in the process it
brings a much higher level of consistency and speed to the process.
Whereas electrical test is limited by the lack of access to the test nodes, the VT8000 can inspect even the most demanding of
components such as very fine pitch QFP packages, looking at every leg for the alignment and solder quality.
The Future.
Products manufactured by Schuh are future proofed by careful design allowing for enhancements such as x-ray inspection and even f
iner pitch components when they are used in high volume production. All of the systems now being delivered by Schuh are capable
of being upgraded with the addition of x-ray and have high rťsolution camťras fitted as standard. At present these cameras are only
used for fiducial recognition and fine pitch components with leg spacing below 0.4mm, demonstrating Schuh's commitment to the future!.
Recognition principles.
To detect the presence of components the VT8000 uses a technique known as edge location. By projecting powerful lights
at predetermined angles, the faces of the component are either dark or bright. The point at which the individual pixels change
can be calculated to give the edge of the component. By repeating this right around the component the outline can be accurately
generated. To inspect the solder shapes various algorithms are employed. Routines are carried out to locate the point at which
the leg leaves the body of the component, the end of the pad on which the leg is soldered and subsequently the end of the leg to
find the precise point at which the solder is supposed to be. Once this is established, it is possible to generate a three dimensional
shape on the meniscus of the joint as the light moves from one source to another. By comparing this shape with libraries of good, bad
soldered, bad un-soldered, and interpolating in between it is possible to determine whether the joint is satisfactory.
 ...
... ...
...
System characteristics
.
The system includes 10 CCD cameras, being the optimum number to allow for pinpoint visual recognition and accuracy. The cameras
are arranged in a logical sequence angled around the area of inspection and vertical mounted overhead. Of these, five are for the
standard resolution with a field of view of 26mm x 26mm and five are for high rťsolution bringing the area of view down to 6.5mm x 6.5mm.
22 high power Xenon lights are arranged in between the cameras giving a modulated and controlled amount of light for the type of board
being inspected.
Once the prťcision linear motors drive the board to the correct place, all of the light patterns are fired in sequence whilst taking pictures
from all of the cameras. Immediately this has been completed, the machine moves to the next location during which time the information
is processed using a technique called video banking. This splits the generous 22MB of video RAM into two sections, allowing
simultaneous processing of two sets of information and speeding up the processing time considerably.
Component editor
The component editor controls several key aspects of the machine. Primarily it assigns which individual window the
components are tested in, and secondly the type of tests the components is subjected to.
Certain sections of the editor are used to control the test mode whether it may be for testing just a number of tagged
components, or the whole assembly. The ease of use has been paramount within the design with features built in to
allow selection by type of component, value, or shape permitting straightforward, but comprehensive editing of the program.
The layout allows for displaying all the important settings such as the test status and a fault readout.

Ease of use.
The VT8000 series has been designed for engineers and operators alike to be used in a straightforward way, making the software
intuitive and easy to grasp. Built in software routines make for smooth transition from CAD data to a working program. Routines
such as windowise split the board area up into manageable units that fit neatly into the camera optical viewing area.

Fault identification.
Various options are available to help with the identification of faults. A laser pointing table gives an accurate indication as to where
the fault lies. Software routines can enable direct feedback to the tester for self correction.
Paperless repair facility.
The VT8000 series has a paperless repair software system as standard, providing information such as Serial Numbers, date and fault codes. Complete data is held recording the number of times a board is tested and what faults were found.
Other features.
Network Link.
Although an IBM Token Ring is recommended, all standard networks can be catered for allowing
smooth intťgration into any standard factory installation.
High and low resolution Cameras.
All VT8000 series machines have been built with high resolution cameras of 15 Ķm/pixel (6.5mm x 6.5mm visible area) and standard resolution of 60 Ķm/Pixel (26mm x 26mm) cameras designed to be able to handle the finest pitch components down to 0.4mm leg spacing.
Linear synchronous motors.
Only prťcision linear synchromotors with 100% closed loop feedback measurement units are used to
give the total accuracy required for a machine such as this.
CAD generation of programs.
CAD generated positions for the component placement checking are used in order to keep the same reference points between that of the designer and manufacturing engineer to achieve the best possible quality and reliability of product.
Fiducial marks.
The system has a facility to auto learn pattern recognition (fiducial) marks removing the need for a complex library of shapes.
Large library of standard components.
All standard component shapes are pre programmed into the VT8000. New styles can either be
added using the component library define capability.
Snapshot capability!
An important feature of the VT8000 is the ability to take pictures of components so that they can be downloaded by modem for analysis by engineers at Schuh. The instant advice and help can then be available at all times.
Trend alarms.
The ability to spot trends and detect faults at the earliest stage of the production cycle is crucial to a manufacturing engineer in a high volume plant. By utilising the built in Trend alarms it can identify the process faults immediately the fault rate rises above a given level.
Optional bar code readers.
Serial numbers can be entered either manually or by utilising bar code readers mounted in line for a
fully automated input.
Technical information
Maximum UUT size : 500 x 300mm
- Maximum component height : 50mm above adapter, 80mm below.
- Test module : X-Y-Z Table with high resolution linear encoders. Software control for 3 additional motors such as magazine handlers and automatic width adjustment.
- Lighting system :
22 Xenon flashes - maximum output 900W
- Image processing card : 22.5Mbvideo memory processing images from 5 cameras simultaneously.
- Process control unit (CPU).
Pentium based CPU, 133MHz, IGB hard disk, Operating system OS/2 warp.
- Programming station :
17" Monitor, keyboard and mouse working within OS/2 warp windows interface.
- Components tested : Resistors, Capacitors, MELF, glass diodes transistors, IC's and through hole components.
- Test time :
Approximately 0.6s per window

Contact
France :
Schuh France
Montrouge, France (1)47 46 17 07

Remarques ŗ : Jacques Weiss@supelec.fr.


 ...
... ...
...


